
0. 前言
其实本章想要描述的函数的功能和内存的关系并不大,但是在启动流程中,paging_init后,该函数unflatten_device_tree就会被执行。为了启动流程的完整性,也鉴于此函数也确实有必要花时间去介绍。
作为Linux BSP驱动工程师我们在适配驱动的流程里,可能就是配置DTS,适配驱动代码,然后两者根据dts里的compatible属性进行匹配,就okay了。那其实是有问题的,从Linux设备驱动模型中我们可以知道,驱动代码中会将驱动注册成struct device_driver。
设备树的产生就是为了替代driver中过多的platform_device部分的静态定义,将硬件资源抽象出来,由系统统一解析,这样就可以避免各驱动中对硬件资源大量的重复定义。
这样一来,几乎可以肯定的是,设备树中的节点最终目标是转换成struct device,在驱动开发时就只需要添加相应的platform driver部分进行匹配即可。
那DTS的节点如何被创建成
struct device的设备的呢?
{% tip success %}
注意:开机过程中设备树的解析是从setup_arch中开始的,此函数中setup_machine_fdt以及arm_memblock_init都会对dtb做一下解析的操作。
详情请看:
[linux内存管理] 第007篇 fixmap映射详解
[linux内存管理] 第008篇 memblock子系统详解
{% endtip %}
经过上一篇 [linux内存管理] 第010篇 paging_init详解 分析结束之后,setup_arch函数的分析也来到了本章的主角unflatten_device_tree。
1. unflatten_device_tree
void __init unflatten_device_tree(void)
{
	__unflatten_device_tree(initial_boot_params, NULL, &of_root,
				early_init_dt_alloc_memory_arch, false);

	/* Get pointer to "/chosen" and "/aliases" nodes for use everywhere */
	of_alias_scan(early_init_dt_alloc_memory_arch);

	unittest_unflatten_overlay_base();
}
主要的两个函数:
- __unflatten_device_tree(): 从 dtb 的起始地址开始,用以展开dtb 中节点,并将这部分内容保存到固定的 reserved memory 中;
- of_alias_scan(): 扫描 aliases 节点并展开,将里面的属性保存到全局链表 aliases_loopup 中;
下面单独来剖析这两个函数。
2. __unflatten_device_tree
void *__unflatten_device_tree(const void *blob,
			      struct device_node *dad,
			      struct device_node **mynodes,
			      void *(*dt_alloc)(u64 size, u64 align),
			      bool detached)
{
	int size;
	void *mem;
	int ret;

	if (mynodes)
		*mynodes = NULL;

	pr_debug(" -> unflatten_device_tree()\n");

	if (!blob) {
		pr_debug("No device tree pointer\n");
		return NULL;
	}

	pr_debug("Unflattening device tree:\n");
	pr_debug("magic: %08x\n", fdt_magic(blob));
	pr_debug("size: %08x\n", fdt_totalsize(blob));
	pr_debug("version: %08x\n", fdt_version(blob));

	//check dtb 是否有效,在setup_machine_fdt()中也做过check
	if (fdt_check_header(blob)) {
		pr_err("Invalid device tree blob header\n");
		return NULL;
	}

	/* First pass, scan for size */
	//第一次展开,确认所有device_node的总的size
	size = unflatten_dt_nodes(blob, NULL, dad, NULL);
	if (size <= 0)
		return NULL;

	size = ALIGN(size, 4);
	pr_debug("  size is %d, allocating...\n", size);

	/* Allocate memory for the expanded device tree */
	//调用回调函数,为所有device_node申请内存,dt_alloc为函数第四个参数
	// 在unflatten_device_tree中也就是early_init_dt_alloc_memory_arch,实际上也就是memblock_alloc
	// 返回值mem即为满足size+4大小的物理内存空间对应的线性区域的虚拟地址
	mem = dt_alloc(size + 4, __alignof__(struct device_node));
	if (!mem)
		return NULL;

	memset(mem, 0, size);

	*(__be32 *)(mem + size) = cpu_to_be32(0xdeadbeef);

	pr_debug("  unflattening %p...\n", mem);

	/* Second pass, do actual unflattening */
	//第二次展开,进行填充
	ret = unflatten_dt_nodes(blob, mem, dad, mynodes);

	if (be32_to_cpup(mem + size) != 0xdeadbeef)
		pr_warn("End of tree marker overwritten: %08x\n",
			be32_to_cpup(mem + size));

	if (ret <= 0)
		return NULL;

	if (detached && mynodes && *mynodes) {
		of_node_set_flag(*mynodes, OF_DETACHED);
		pr_debug("unflattened tree is detached\n");
	}

	pr_debug(" <- unflatten_device_tree()\n");
	return mem;
}
参数:
- blob: 设备节点所在的内存地址,这里传入的是 dtb的首地址;
- dad: 默认为 NULL,在 fdt overlay 中会使用,这里不做过多描述;
- mynodes: device_node 的地址,解析 device tree 之后将节点信息存入,这里传入的是 of_root;
- dt_alloc: 申请内存的回调函数,这里使用
early_init_dt_alloc_memory_arch()函数; - detached: 是否配置该节点为 OF_DETACHED 属性,这里设为 false,fdt overlay 调用的时候传入的是 true;
该函数主要经过两次的 unflatten_dt_nodes(),第一次unflatten 扫描得出设备树转换成device node 需要的空间,之后通过 dt_alloc() 申请内存,从上文得知该回调函数为 early_init_dt_alloc_memory_arch(),实际上就是memblock_alloc去申请了内存。 ,第二次unflatten 进行真正的解析工作,彻底展开所有的device_node 信息。
2.1 unflatten_dt_nodes
第一个参数是设备树存放首地址,第二个参数是申请的内存空间,第三个参数为父节点,初始值为NULL,第四个参数为mynodes,初始值为of_node.
static int unflatten_dt_nodes(const void *blob,void *mem,struct device_node *dad,struct device_node **nodepp)
{
    // ...
    for (offset = 0;offset >= 0 && depth >= initial_depth;offset = fdt_next_node(blob, offset, &depth)) {
        populate_node(blob, offset, &mem,nps[depth],fpsizes[depth],&nps[depth+1], dryrun);
        // ...
    }
}
这个函数中主要的作用就是从根节点开始,对子节点依次调用populate_node(),从函数命名上来看,这个函数就是填充节点,为节点分配内存。
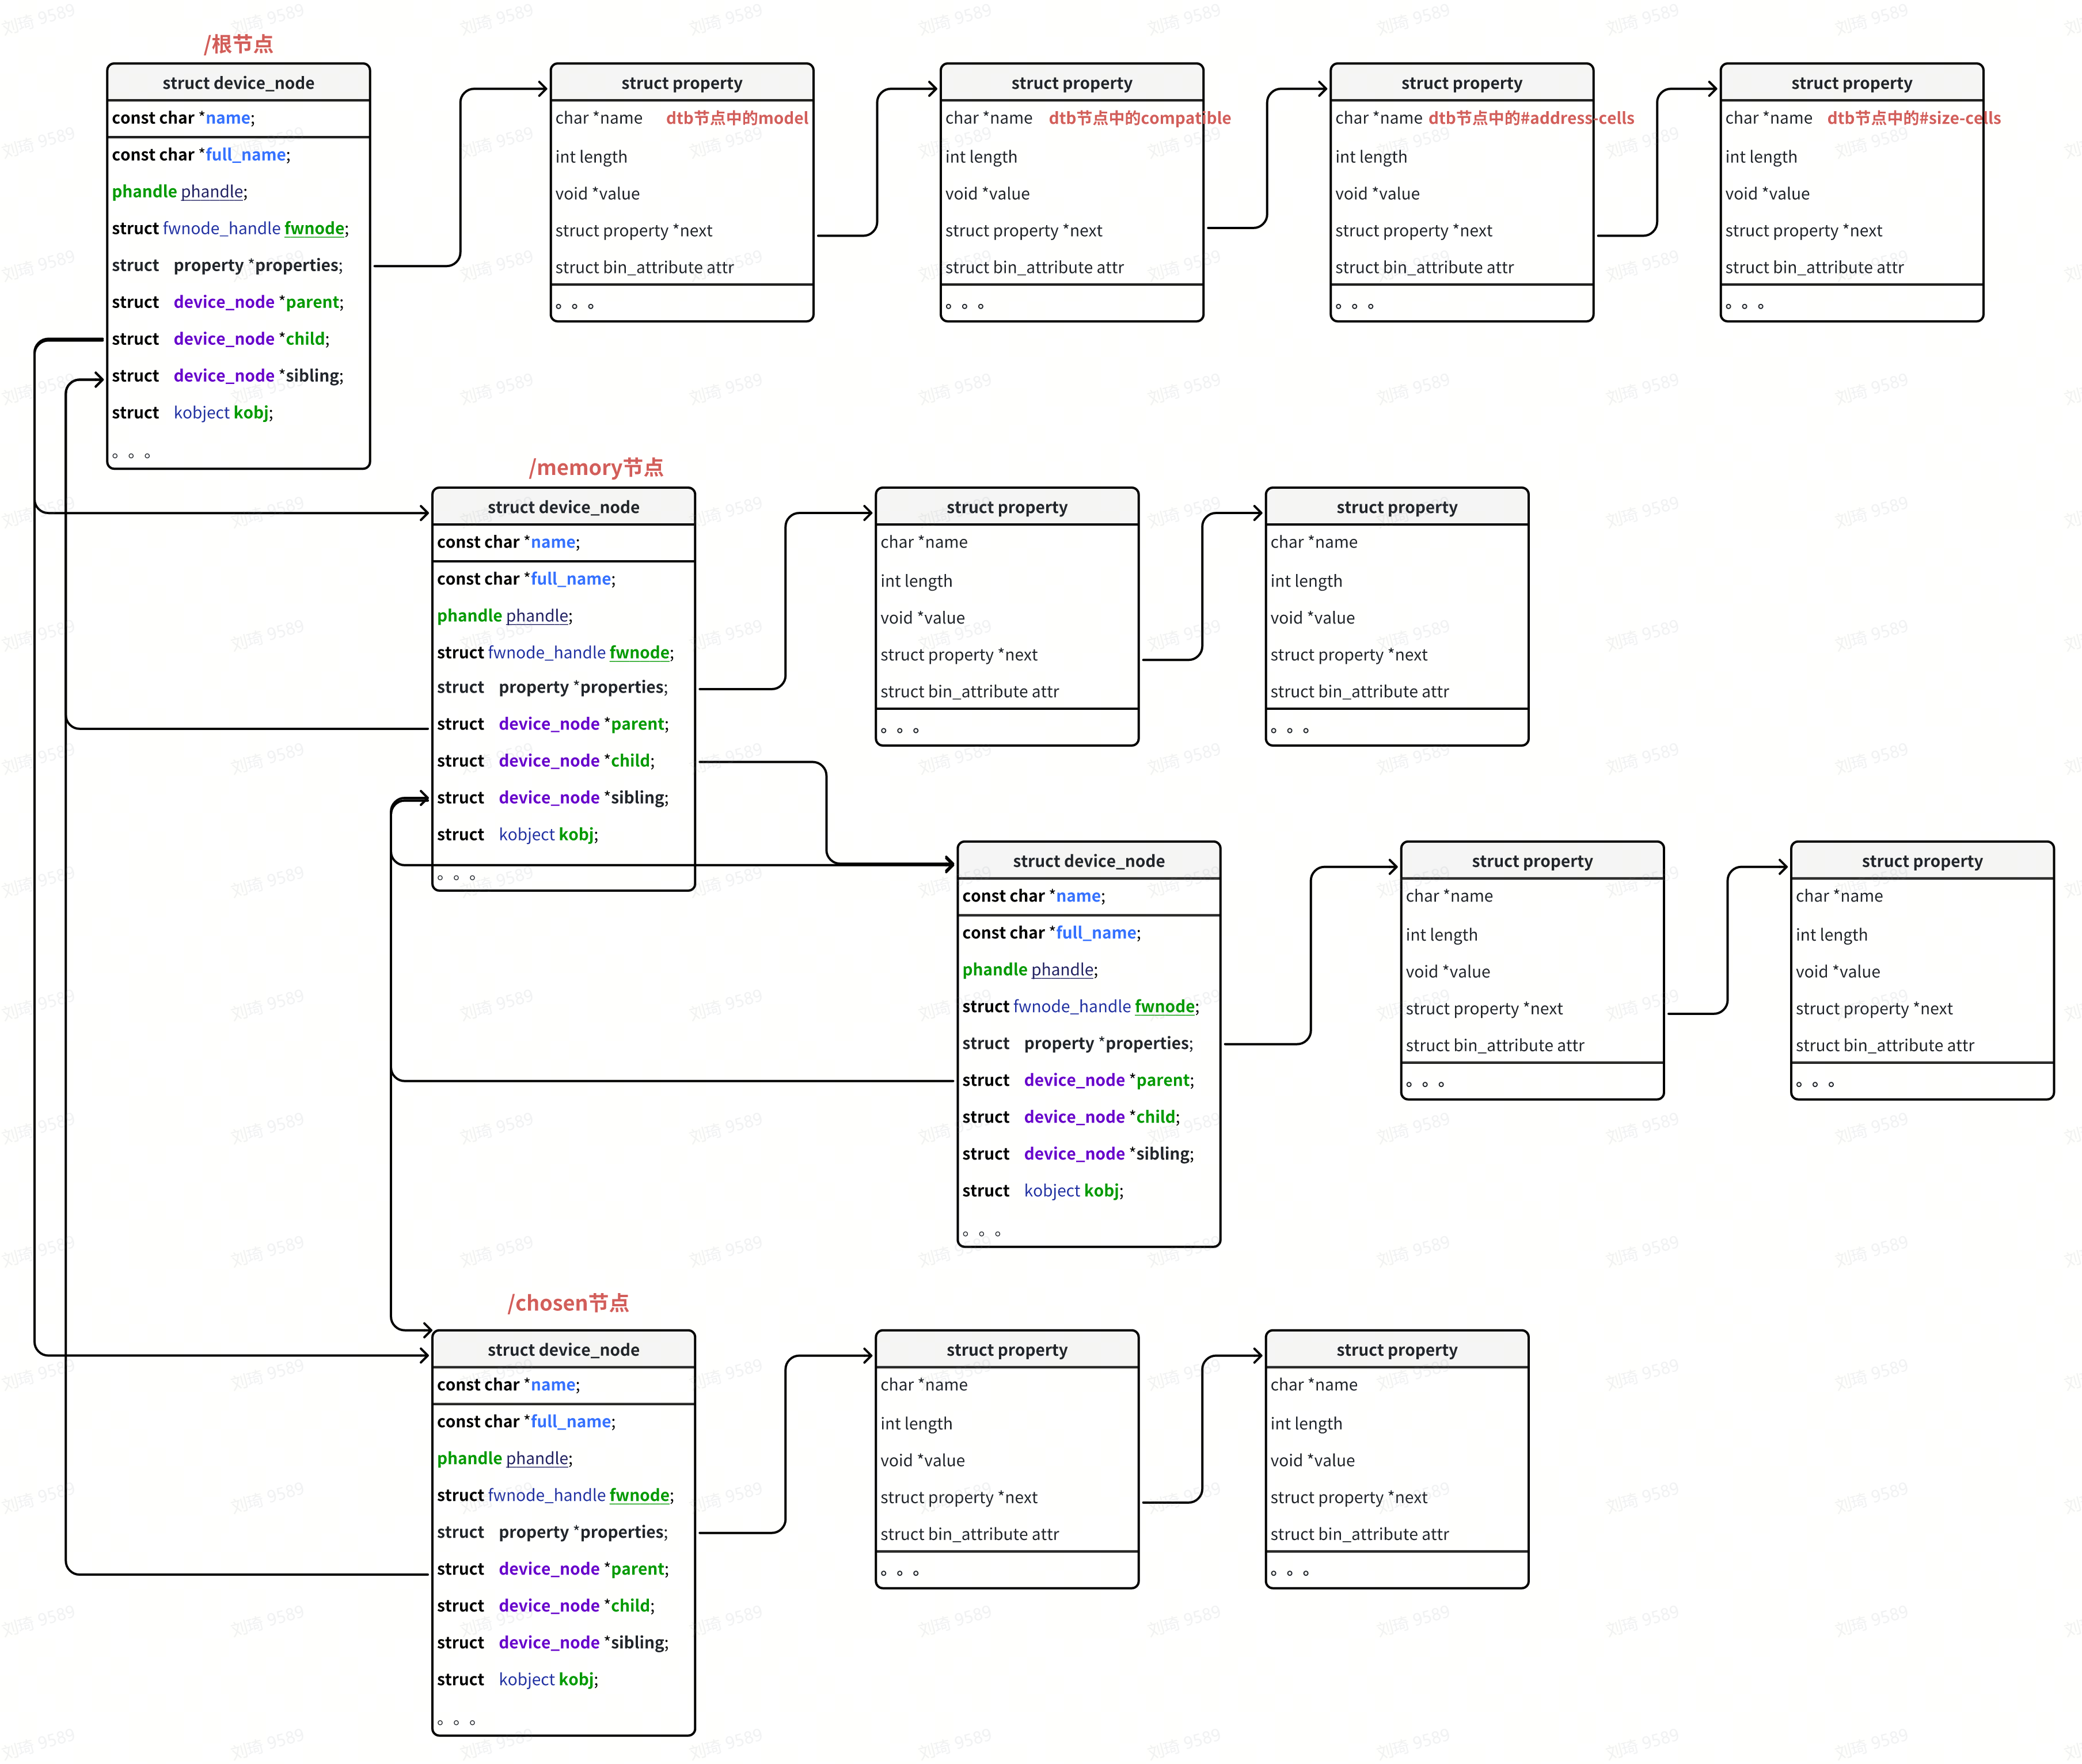
2.2 struct device_node原型
struct device_node {
	const char *name;
	phandle phandle;
	const char *full_name;
	struct fwnode_handle fwnode;

	struct	property *properties;
	struct	property *deadprops;	/* removed properties */
	struct	device_node *parent;
	struct	device_node *child;
	struct	device_node *sibling;
#if defined(CONFIG_OF_KOBJ)
	struct	kobject kobj;
#endif
	unsigned long _flags;
	void	*data;
#if defined(CONFIG_SPARC)
	unsigned int unique_id;
	struct of_irq_controller *irq_trans;
#endif
};
结构体成员:
- name:设备节点中的name属性转换而来。
- type:由设备节点中的device_type转换而来。
- phandle:有设备节点中的"phandle"和"linux,phandle"属性转换而来,特殊的还可能由"ibm,phandle"属性转换而来。
- full_name:这个指针指向整个结构体的结尾位置,在结尾位置存储着这个结构体对应设备树节点的unit_name,意味着一个struct device_node结构体占内存空间为sizeof(struct device_node)+strlen(unit_name)+字节对齐。
- properties:这是一个设备树节点的属性链表,属性可能有很多种,比如:"interrupts","timer","hwmods"等等。
- parent,child,sibling:与当前属性链表节点相关节点,所以相关链表节点构成整个device_node的属性节点。
- kobj:用于在/sys目录下生成相应用户文件。
2.3 struct property
struct property {
	char	*name;
	int	length;
	void	*value;
	struct property *next;

#if defined(CONFIG_OF_KOBJ)
	struct bin_attribute attr;
#endif
}
每个devicde_node 节点会存放很多节点的 property,例如 interrupts、clock-names等等。
成员:
- name: 属性名;
- length: 属性值长度;
- value: 属性值;
- next: 指向下一个 property;
对于 device_node 的关系,借鉴一下:
2.4 populate_properties
static void populate_properties(const void *blob,int offset,void **mem,struct device_node *np,const char *nodename,bool dryrun){
    // ...
    for (cur = fdt_first_property_offset(blob, offset);
         cur >= 0;
         cur = fdt_next_property_offset(blob, cur))
    {
        fdt_getprop_by_offset(blob, cur, &pname, &sz);
        unflatten_dt_alloc(mem, sizeof(struct property),__alignof__(struct property));
        if (!strcmp(pname, "phandle") ||  !strcmp(pname, "linux,phandle")) {
            if (!np->phandle)
                np->phandle = be32_to_cpup(val);

            pp->name   = (char *)pname;
            pp->length = sz;
            pp->value  = (__be32 *)val;
            *pprev     = pp;
            pprev      = &pp->next;
            // ...
        }
    }
}
从属性转换部分的程序可以看出,对于大部分的属性,都是直接填充一个struct property属性;
而对于"phandle"属性和"linux,phandle"属性,直接填充struct device_node的phandle字段,不放在属性链表中。
3. of_alias_scan
of_alias_scan(early_init_dt_alloc_memory_arch);
从名字来看,这个函数的作用是解析根目录下的alias
void of_alias_scan(void * (*dt_alloc)(u64 size, u64 align))
{
	struct property *pp;

	//查找设备树中的aliases节点
	of_aliases = of_find_node_by_path("/aliases");
	//查找chosen节点
	of_chosen = of_find_node_by_path("/chosen");
	if (of_chosen == NULL)
		of_chosen = of_find_node_by_path("/chosen@0");

	// 如果存在chosen节点,其额定linux,stdout-path和stdout的值
	if (of_chosen) {
		/* linux,stdout-path and /aliases/stdout are for legacy compatibility */
		const char *name = NULL;

		if (of_property_read_string(of_chosen, "stdout-path", &name))
			of_property_read_string(of_chosen, "linux,stdout-path",
						&name);
		if (IS_ENABLED(CONFIG_PPC) && !name)
			of_property_read_string(of_aliases, "stdout", &name);
		if (name)
			of_stdout = of_find_node_opts_by_path(name, &of_stdout_options);
	}

	if (!of_aliases)
		return;

	//轮询of_aliases节点
	for_each_property_of_node(of_aliases, pp) {
		const char *start = pp->name;
		const char *end = start + strlen(start);
		struct device_node *np;
		struct alias_prop *ap;
		int id, len;

		/* Skip those we do not want to proceed */
		//跳过name、phandle、linux,phandle属性
		if (!strcmp(pp->name, "name") ||
		    !strcmp(pp->name, "phandle") ||
		    !strcmp(pp->name, "linux,phandle"))
			continue;
		//查找aliases中value所在的device_node
		np = of_find_node_by_path(pp->value);
		if (!np)
			continue;

		/* walk the alias backwards to extract the id and work out
		 * the 'stem' string */
		//去掉属性name最后的数字
		while (isdigit(*(end-1)) && end > start)
			end--;
		len = end - start;

		//解析id
		if (kstrtoint(end, 10, &id) < 0)
			continue;

		/* Allocate an alias_prop with enough space for the stem */
		//申请一个alias_prop的内粗你,用以存放alias的属性
		ap = dt_alloc(sizeof(*ap) + len + 1, __alignof__(*ap));
		if (!ap)
			continue;
		memset(ap, 0, sizeof(*ap) + len + 1);
		ap->alias = start;
		//将alias_prop插到aliases_lookup的尾部
		of_alias_add(ap, np, id, start, len);
	}
}
of_alias_scan()函数先是处理设备树chosen节点中的"stdout-path"或者"stdout"属性(两者最多存在其一),然后将stdout指定的path赋值给全局变量of_stdout_options,并将返回的全局struct device_node类型数据赋值给of_stdout,指定系统启动时的log输出。
接下来为aliases节点申请内存空间,如果一个节点中同时没有name/phandle/linux,phandle,则被定义为特殊节点,对于这些特殊节点将不会申请内存空间。
然后,使用of_alias_add()函数将所有的aliases内容放置在aliases_lookup链表中。
在上一节中讲到设备树dtb文件中的各个节点转换成device_node的过程(《dtb转换成device_node 》),每个设备树子节点都将转换成一个对应的device_node节点。
设备树dts文件最终在linux内核中会转化成platform_device:dts->dtb ->device_node->platform_device
那么,接下来,我们就来看看linux内核如何把device_node转换成platfrom_device。
device_node转换为platform_device是有条件的
首先,对于所有的device_node,如果要转换成platform_device,除了节点中必须有compatible属性以外,必须满足以下条件:
一般情况下,只对设备树中根的第1级节点(/xx)注册成platform device,也就是对它们的子节点(/xx/*)并不处理。
如果一个结点的compatile属性含有这些特殊的值("simple-bus","simple-mfd","isa","arm,amba-bus")之一,并且自己成功注册成了platform_device,, 那么它的子结点(需含compatile属性)也可以转换为platform_device(当成总线看待)。
根节点(/)是例外的,生成platfrom_device时,即使有compatible属性也不会处理
设备树结点的什么属性会被转换?
如果是device_node转换成platform device,这个转换过程又是怎么样的呢?
在老版本的内核中,platform_device部分是静态定义的,其实最主要的部分就是resources部分,这一部分描述了当前驱动需要的硬件资源,一般是IO,中断等资源。
在设备树中,这一类资源通常通过reg属性来描述,中断则通过interrupts来描述;
所以,设备树中的reg和interrupts资源将会被转换成platform_device内的struct resources资源。
那么,设备树中其他属性是怎么转换的呢?
答案是:不需要转换,在platform_device中有一个成员struct device dev,这个dev中又有一个指针成员struct device_node *of_node。
linux的做法就是将这个of_node指针直接指向由设备树转换而来的device_node结构;留给驱动开发者自行处理。
例如,有这么一个struct platform_device* of_test。我们可以直接通过of_test->dev.of_node来访问设备树中的信息。
4. of_platform_default_populate_init
函数的执行入口是,在系统启动的早期进行的of_platform_default_populate_init。
其实这边直接转到这儿是有点突兀的,这里解释一下为什么直接跳转这儿?
首先该还是被注册成arch_initcall_sync,在开机过程中do_initcalls 会按段的优先级从早到晚逐步调用每个函数,
static void __init do_initcalls(void)
{
    initcall_t *fn;

    for (fn = __initcall_start; fn < __initcall_end; fn++) {
        do_one_initcall(*fn);
    }
}
各阶段初始化函数的调用顺序如下:
early_initcall -> .initcall0.init
core_initcall -> .initcall1.init
postcore_initcall -> .initcall2.init
arch_initcall -> .initcall3.init
subsys_initcall -> .initcall4.init
fs_initcall -> .initcall5.init
device_initcall -> .initcall6.init
late_initcall -> .initcall7.init
arch_initcall_sync(of_platform_default_populate_init);
所以此函数是绝对会走到的!
// drivers/of/platform.c
static int __init of_platform_default_populate_init(void)
{
    struct device_node *node;

    if (!of_have_populated_dt())
        return -ENODEV;

    /*
     * Handle ramoops explicitly, since it is inside /reserved-memory,
     * which lacks a "compatible" property.
     */
    node = of_find_node_by_path("/reserved-memory");
    if (node) {
        node = of_find_compatible_node(node, NULL, "ramoops");
        if (node)
            of_platform_device_create(node, NULL, NULL);
    }

    /* Populate everything else. */
    of_platform_default_populate(NULL, NULL, NULL);

    return 0;
}
arch_initcall_sync(of_platform_default_populate_init);
在函数of_platform_default_populate_init()中,调用了of_platform_default_populate(NULL, NULL, NULL);,传入三个空指针:
int of_platform_default_populate(struct device_node *root,const struct of_dev_auxdata *lookup,struct device *parent)
{
    return of_platform_populate(root, of_default_bus_match_table, lookup,
                    parent);
}
of_platform_default_populate()调用了of_platform_populate(),我们注意下of_default_bus_match_table
4.1 of_default_bus_match_table
const struct of_device_id of_default_bus_match_table[] = {
    { .compatible = "simple-bus", },
    { .compatible = "simple-mfd", },
    { .compatible = "isa", },
    #ifdef CONFIG_ARM_AMBA
        { .compatible = "arm,amba-bus", },
    #endif /* CONFIG_ARM_AMBA */
        {} /* Empty terminated list */
};
如果节点的属性值为 "simple-bus","simple-mfd","isa","arm,amba-bus "之一的话,那么它子节点就可以转化成platform_device。
5. of_platform_populate
int of_platform_populate(struct device_node *root,
            const struct of_device_id *matches,
            const struct of_dev_auxdata *lookup,
            struct device *parent)
{
    struct device_node *child;
    int rc = 0;

    // 从设备树中获取根节点的device_node结构体
    root = root ? of_node_get(root) : of_find_node_by_path("/");
    if (!root)
        return -EINVAL;

    pr_debug("%s()\n", __func__);
    pr_debug(" starting at: %pOF\n", root);

    //遍历所有的子节点
    for_each_child_of_node(root, child) {
        // 然后对每个根目录下的一级子节点 创建 bus
        // 例如, /r1 , /r2,而不是 /r1/s1
        rc = of_platform_bus_create(child, matches, lookup, parent, true);
        if (rc) {
            of_node_put(child);
            break;
        }
    }
    of_node_set_flag(root, OF_POPULATED_BUS);

    of_node_put(root);
    return rc;
}
EXPORT_SYMBOL_GPL(of_platform_populate);
在调用of_platform_populate()时传入了的matches参数是of_default_bus_match_table[];
这个table是一个静态数组,这个静态数组中定义了一系列的compatible属性:"simple-bus"、"simple-mfd"、"isa"、"arm,amba-bus"。
按照我们上文中的描述,当某个根节点下的一级子节点的compatible属性为这些属性其中之一时,它的一级子节点也将由device_node转换成platform_device.
到底是不是这样呢?接着往下看。
6. of_platform_bus_create
static int of_platform_bus_create(struct device_node *bus,
                  const struct of_device_id *matches,
                  const struct of_dev_auxdata *lookup,
                  struct device *parent, bool strict)
{
    const struct of_dev_auxdata *auxdata;
    struct device_node *child;
    struct platform_device *dev;
    const char *bus_id = NULL;
    void *platform_data = NULL;
    int rc = 0;

    // ...

    // 创建of_platform_device、赋予私有数据
    dev = of_platform_device_create_pdata(bus, bus_id, platform_data, parent);

    // 判断当前节点的compatible属性是否包含上文中compatible静态数组中的元素
    // 如果不包含,函数返回0,即,不处理子节点。
    if (!dev || !of_match_node(matches, bus))
        return 0;

    for_each_child_of_node(bus, child) {
        pr_debug("   create child: %pOF\n", child);
        // 创建 of_platform_bus
        /*
           如果当前compatible属性中包含静态数组中的元素,
           即当前节点的compatible属性有"simple-bus"、"simple-mfd"、"isa"、"arm,amba-bus"其中一项,
           把子节点当作对应的总线来对待,递归地对当前节点调用`of_platform_bus_create()`
           即,将符合条件的子节点转换为platform_device结构。
        */
        rc = of_platform_bus_create(child, matches, lookup, &dev->dev, strict);
        if (rc) {
            of_node_put(child);
            break;
        }
    }
    of_node_set_flag(bus, OF_POPULATED_BUS);
    return rc;
}
6.1 of_platform_device_create_pdata
这个函数实现了:创建of_platform_device、赋予私有数据
此时的参数platform_data为NULL。
static struct platform_device *of_platform_device_create_pdata(
                    struct device_node *np,
                    const char *bus_id,
                    void *platform_data,
                    struct device *parent)
{
    // 终于看到了平台设备
    struct platform_device *dev;

    // ...

    // 创建实例,将传入的device_node链接到成员:dev.of_node中
    dev = of_device_alloc(np, bus_id, parent);
    if (!dev)
        goto err_clear_flag;

    // 登记到 platform 中
    dev->dev.bus = &platform_bus_type;
    dev->dev.platform_data = platform_data;
    of_msi_configure(&dev->dev, dev->dev.of_node);

    // 添加当前生成的platform_device。
    if (of_device_add(dev) != 0) {
        platform_device_put(dev);
        goto err_clear_flag;
    }

    return dev;

err_clear_flag:
    of_node_clear_flag(np, OF_POPULATED);
    return NULL;
}
6.2 of_device_alloc
struct platform_device *of_device_alloc(struct device_node *np,const char *bus_id,struct device *parent)
{
    //统计reg属性的数量
    while (of_address_to_resource(np, num_reg, &temp_res) == 0)
	    num_reg++;
    //统计中断irq属性的数量
    num_irq = of_irq_count(np);
    //根据num_irq和num_reg的数量申请相应的struct resource内存空间。
    if (num_irq || num_reg) {
        res = kzalloc(sizeof(*res) * (num_irq + num_reg), GFP_KERNEL);
        if (!res) {
            platform_device_put(dev);
            return NULL;
        }
        //设置platform_device中的num_resources成员
        dev->num_resources = num_reg + num_irq;
        //设置platform_device中的resource成员
        dev->resource = res;

        //将device_node中的reg属性转换成platform_device中的struct resource成员。
        for (i = 0; i < num_reg; i++, res++) {
            rc = of_address_to_resource(np, i, res);
            WARN_ON(rc);
        }
        //将device_node中的irq属性转换成platform_device中的struct resource成员。
        if (of_irq_to_resource_table(np, res, num_irq) != num_irq)
            pr_debug("not all legacy IRQ resources mapped for %s\n",
                np->name);
    }
    //将platform_device的dev.of_node成员指针指向device_node。
    dev->dev.of_node = of_node_get(np);
    //将platform_device的dev.fwnode成员指针指向device_node的fwnode成员。
    dev->dev.fwnode = &np->fwnode;
    //设备parent为platform_bus
    dev->dev.parent = parent ? : &platform_bus;
}
首先,函数先统计设备树中reg属性和中断irq属性的个数,然后分别为它们申请内存空间,链入到platform_device中的struct resources成员中。
除了设备树中"reg"和"interrupt"属性之外,还有可选的"reg-names"和"interrupt-names"这些io中断资源相关的设备树节点属性也在这里被转换。
将相应的设备树节点生成的device_node节点链入到platform_device的dev.of_node中。
最终,我们能够通过在自己的驱动中,使用struct device_node *node = pdev->dev.of_node;获取到设备树节点中的数据。
6.3 of_device_add
int of_device_add(struct platform_device *ofdev){
    // ...
    return device_add(&ofdev->dev);
}
将当前platform_device中的struct device成员注册到系统device中,并为其在用户空间创建相应的访问节点。
这一步会调用platform_match,因此最终也会执行设备树的match,以及probe。